eclipse 기반 입니다.
Dynamic Web project를 선택합니다. 프로젝트를 우클릭 하시고 Configure -> Convert to Maven project를 클릭합니다.

Group Id와 Artifact Id를 입력하고 Finish 합니다.

그럼 pom.xml 파일이 생성된걸 확인하실 수 있습니다.
프로젝트 우클릭 New -> SourceFolder 를 클릭하세요.

src/main/java, src/main/resources 폴더를 만들어주세요.
Update exclusion filters in other source folders to solve nesting 체크하셔야 합니다.

폴더 구조는 아래와 같이 만듭니다.
그리고 lib 폴더 안에 있던 jar 파일과 lib 폴더는 삭제해 주세요.
왜냐. maven을 활용할 것이기 때문입니다.

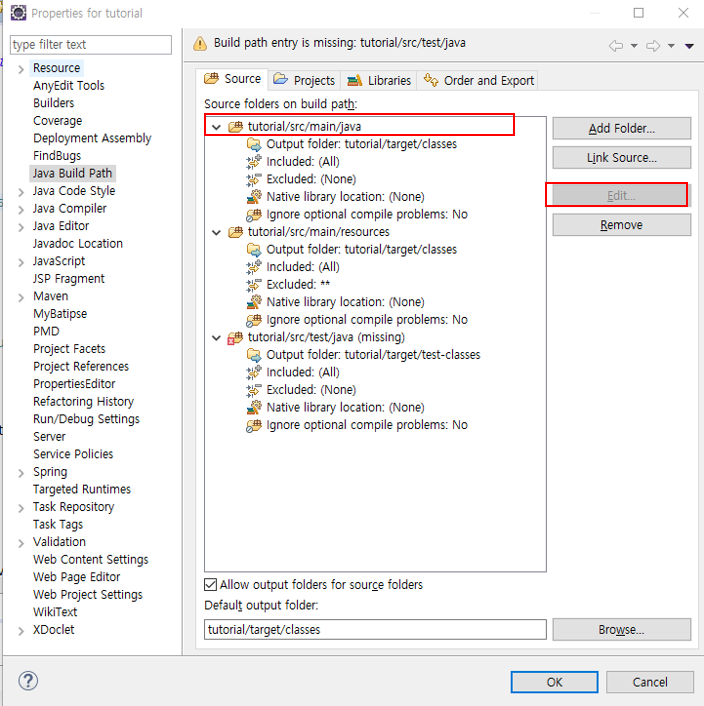
프로젝트 선택하고 alt + Enter 하면 Properties for tutorial 창이 뜹니다.
여기에서 Java Build Path 를 선택하세요.
Add Folder를 클릭해서 build하고자하는 source folder를 설정해 줍니다.
- src/main/java
- src/main/resources
- src/main/test

여기서 tutorial/src/main/ 를 선택하시고 edit 버튼을 클릭해주세요. Next 한번하시고 Exclusion patterns 에 ** 을 추가 해주세요.

이제 Deployment Assembly 를 선택하신 다음에 아래처럼 만들어 주세요.

여기까지 완료하면 pom.xml 을 작성합니다.


pom.xml 을 작성하고 난 뒤에 프로젝트를 선택하고 alt+F5를 눌러서 maven을 update 합니다.
그럼 아래처럼 mavenDependencies를 확인하실 수 있습니다.

이제 톰캣서버를 clean 하고 Publish 한 다음에 톰캣 서버를 올려주세요.

서버를 올린경우 에러가 발생할 수 있습니다.
스프링 설정파일의 위치가 바뀌었기 때문입니다.
이런 경우 web.xml을 수정해 주세요.
ContextLoaderListener 가 찾는 contextConfigLocation 이라는 이름으로 파일 위치를 설정해주세요.
context-param 태그를 추가하시면 됩니다.
그래도 오류가 발생한다면 servlet 설정파일의 위치도 바뀌었기 때문입니다.
아래처럼 init-param 태그에 servlet 설정파일의 위치를 설정해 주세요.
<?xml version="1.0" encoding="UTF-8"?>
<web-app xmlns:xsi="http://www.w3.org/2001/XMLSchema-instance" xmlns="http://java.sun.com/xml/ns/javaee" xsi:schemaLocation="http://java.sun.com/xml/ns/javaee http://java.sun.com/xml/ns/javaee/web-app_3_0.xsd" version="3.0">
  <display-name>tutorial</display-name>

    <listener>
        <listener-class>org.springframework.web.context.ContextLoaderListener</listener-class>
    </listener>

    <context-param>
    	<param-name>contextConfigLocation</param-name>
    	<param-value>classpath:spring/applicationContext.xml</param-value>
    </context-param>

    <servlet>
        <servlet-name>app</servlet-name>
        <servlet-class>org.springframework.web.servlet.DispatcherServlet</servlet-class>
        <init-param>
        	<param-name>contextConfigLocation</param-name>
        	<param-value>classpath:spring/app-servlet.xml</param-value>
        </init-param>
        <load-on-startup>1</load-on-startup>
    </servlet>

    <servlet-mapping>
        <servlet-name>app</servlet-name>
        <url-pattern>/</url-pattern>
    </servlet-mapping>

  <welcome-file-list>
    <welcome-file>index.html</welcome-file>
    <welcome-file>index.htm</welcome-file>
    <welcome-file>index.jsp</welcome-file>
    <welcome-file>default.html</welcome-file>
    <welcome-file>default.htm</welcome-file>
    <welcome-file>default.jsp</welcome-file>
  </welcome-file-list>
</web-app>